Sunday, 19 October 2014

Rosie's Stuffed Peppers

Hi all:

I was doing some grocery shopping Friday night (exciting eh?) and saw this beautiful bag of peppers which immediately inspired me to get the ingredients for making stuffed peppers. I love stuffed peppers and have my mother to thank for that.  She is a wonderful cook and made this often when I was growing up. It can be a little fussy if you want to make it correctly, but it is so worth it and very healthy.


This recipe is my simple take on my mom's classic recipe. It has simple, healthy ingredients and tastes wonderful. I made this tonight and it was a hit. Here it is in all its red, orange and yellow glory.

Rosie's Stuffed Peppers
:::::::::::::::::::::::::::::::::::::

1 bag of mixed sweet peppers - I used 7 (I should have made more!) - washed and patted dry
Approx. 1 1/2 lbs. of lean ground beef
1 large can (28 oz.) of whole tomatoes (could use more if making more peppers)
Approx. 3/4 c. Basmati rice (any rice will do)
Salt
Pepper
Garlic powder
Onion powder
2-3 tsp. olive oil
1 - 1 1/2 c. Water
1 - 2 tsp. white sugar

Preheat oven to 350 degrees.  Cut the tops off the peppers, just below the stems and remove all seeds.


Do not throw the tops away! They are the best part, in my humble opinion. I often scavenge the tops from everybody else at the table because once cooked, the underside below the stem is very soft and tasty, especially if charred.

Pour 2-3 tsp. of olive oil into a med-high hot skillet and place the peppers and pepper tops into the skillet to char all sides. Use a splatter screen to protect yourself from the  hot oil that will invariably splash up and onto you if you are not careful. Once the water from the peppers seeps out into the hot oil,  it will make the oil splash out, so be very careful. (An apron is a must here). This is the fussy part of this recipe but makes all the difference, as charred pepper tastes better than uncharred and will also soften up the outside skins.


Once charred, place the pepper bottoms in a large casserole dish that has a lid. Remove the pepper tops to another plate and set aside.


In the same skillet (no need to remove the oil as not much was used and the beef is lean) brown the ground beef at a medium temperature. Once browned, add 3-4 pinches of garlic powder, 3-4 pinches of onion powder, 3-4 pinches of salt and pepper to taste. Mix the seasonings in. Add about 4 handfuls of uncooked basmati rice. You can use any type of rice, but this is what I like to use. Mix all with the ground beef.


The rice will probably not cook through entirely if you stuff the peppers at this stage, so I add about 1 to 1 1/2 cups of water to the pan and slowly simmer the rice for about 10 minutes to cook it before stuffing the peppers. The rice will finish cooking once covered in the oven with the tomato sauce. There is nothing worse than doing all this hard work and having your tasty peppers end up with bits of hard, uncooked rice mixed in with the meat. Trust me. I've done it.


Once the rice is mostly cooked, stuff each pepper with the meat mixture and add the tops back on.


Before adding the can of tomatoes, you must purée them with a hand blender or immersion blender.  I heard about this from Michael Smith, a very well known chef here in Canada. He suggested that using whole canned tomatoes for your tomato sauce was the best way to go because those tomatoes are picked when they are ripe and taste their best and they will taste very fresh in your sauce. He simply put the hand blender right into the can and blended away. So clever, right?


Here is my Wolfgang Puck immersion blender. I love Wolfgang's appliances.


Add the tomato sauce to the peppers. At this point, you can add about 1-2 tsp. of white sugar to the tomato sauce to take away some of the acidity. It really does help. Cover the peppers with a lid and bake in the oven at 350 degrees for about 45 - 60 minutes, or until the peppers seem quite soft and the rice seems cooked.

That's it.


Spoon some tomato sauce onto the meat mixture, serve with a fresh salad of Spring greens and you are done.  Now go have a great time stuffing some peppers!

Rosie


Saturday, 18 October 2014

Rosie's Speedy Jambalaya


Here is another recipe I made a few days ago because I craved a spicy, jambalaya. I got home from class at 5:40 a few days ago, so I needed a quick, throw together meal that tasted great. It has only a few ingredients so it whips up really fast and best of all, it didn't get my husband's "Who Hash" moniker - something he calls a dish that I make up and throw together and is usually a mish-mash of leftovers. (I think this word should be added to the new Webster's dictionary).

For this, I used the most-used appliance in my house; my Wolfgang Puck rice cooker, that I got from The Shopping Channel here in Canada. I use it a couple times/week and it NEVER lets me down - perfect rice every time and best of all, no burnt, warped, destroyed saucepan that someone forgot to turn off after the rice boiled dry. You just add the rice, water, seasonings, oil and push a button and forget about it for about 20 minutes. My kind of wonderful!


You can make all kinds of things in this rice cooker like macaroni and cheese etc. It is a real timesaver. The only bad thing is that I do not have a proper storage place for it (my kitchen is tiny) so I have to store it under the bench seat of the banquette in our eating nook. When I need to use it, I have to climb on all hands and knees under my kitchen table to retrieve it from it's hiding place. Oy veh!

Here is the recipe:

Rosie's Speedy Jambalaya
%%%%%%%%%%%%%

1 package Uncle Ben's Spanish style rice.  (it has a lot of great flavour)
1 can of red kidney beans - rinsed and drained
1 can mixed peas and carrots - drained
6 mild Italian sausages - uncooked
1-2 tsp. olive oil
That's it!!!!


I have made my own jambalaya in the past using plain rice and adding my own seasonings like paprika and garlic and onion powders and while that turned out very good too, this has just a bit more of intense flavour and is very good and so easy.
Place the Italian sausages into a saucepan of water and boil for 15-20 minutes. This will cook the sausage as well as remove some of the fat. At the same time, prepare the rice in your rice cooker per package directions. I added a bit of olive oil to the rice and water and also the can of kidney beans, to soften and cook them. I made the whole package of rice as I made a large batch of jambalaya.  (Have I told you I love leftovers?) 
The rice and sausages should be ready at about the same time. Once the sausages are cooked, remove them from the water and slice them into bite size pieces. In a large skillet, brown the sausage until just golden. (No need to add oil to the skillet as the sausages are greasy enough). Once browned, add the cooked rice and the can of peas/carrots to the skillet. Mix all together and you are good to go. A little sprinkle of Sriracha sauce in your bowl, turns this dish up a notch. (My son's favourite condiment for the moment)

Side note: I never usually buy canned peas and carrots - usually fresh or frozen. I just happened to have them in my pantry as I was planning to make a lot of  easily digestible soups for my husband since he recently had his gallbladder removed. It turns out I didn't need to do that - he is back to eating like he's still got the gallbladder of a teenager (burgers/fries).  I didn't need them after all so decided to use them in this dish.  Since they are already cooked, just warming them in the skillet with the rice, was enough. There you have it. A fast, easy, delicious meal in about 20 minutes. I pride myself on trying to get dinner on the table by 6:00 regardless of how I do it!!!!
(Even if that means take-out, sandwiches or even cake. Yes, I have had cake for dinner. Don't judge me!)

Always,

Rosie

Rosie's Golden Graham Snack Bars

Hi all:


It seems I am always having cravings for something and when that craving hits, watch out! I have to have it, find it in a store or make it and eat it. It becomes so compelling, I have to figure out a way to have it, right then and there. Does anyone else get these cravings? Anyways, I don't really like store-bought snack bars - you know the kind; oats, chocolate chips, frosting, fruit etc. etc. etc...... They are just too sweet for my liking and I always feel guilty eating them because eating 1 just isn't satisfying enough and I would NEVER eat 2, so I wanted something a little more substantial and satisfying that just might be a little (only a little) healthy.  Enter my new recipe for Rosie's Golden Graham Snack Bars.

I intended to use broken up pieces of Graham crackers (I am sure that would also work) but I opted for Golden Graham cereal instead. It just seemed a little easier. Yeah, maybe it's not the healthiest option, but these bars are fantastic and just maybe, you might overlook that too! (You could try adding some quick oats in place of some of the cereal. It would add some fibre and cut down on the sugar)


Here is the recipe in all it's delicious Golden Graham Glory!

Rosie's Golden Graham Snack Bars
~~~~~~~~~~~~~~~~~~~~~~~~~~
1/4 c. Margarine or butter
1 large package miniature marshmallows (about 8 cups?)
8 cups Golden Graham cereal
1/4 c. Milk chocolate chips
Approx. 1/2 package regular Craisins
1 tsp. vanilla extract
Approx. 3 handfuls of cashews
Approx. 3 handfuls of raw pumpkin seeds or sunflower seeds(I forgot to add these to this batch)

You make these like Rice Crispie Squares, so in a large Dutch oven or saucepan, melt the butter and add all the marshmallows. Stir on med/low heat until all the marshmallows are melted. Remove them from heat and add the vanilla and the chocolate chips. You now have a whole heap of ooey, gooey chocolately goodness in that saucepan. Don't be tempted to take a spoon and sample it!
Stir in all the Golden Graham cereal, the Craisins and the cashews. Stir quickly, as once the mixture cools, it gets really sticky and is harder to spread.

Spread this mixture into a large, greased baking pan or casserole dish (Approx.9x13).  Let cool and cut into squares. I guarantee this will be a hit and best of all, your kids will love them for their school lunches. You never have to buy those expensive snack bars again! Sure, my recipe maybe isn't the healthiest thing on this planet, but your kids are getting vitamin C from the Craisins and lots of protein from the cashews and vitamins from the pumpkin seeds and YOU control the ingredients.  

This recipe would also work well with almonds, or pecans (you know everyone is talking about eating some type of nut every day for heart health). Oh, I just thought of something I forgot to put into the recipe!  I was planning on putting shelled pumpkin seeds in it as well, to ramp up the "healthy" factor. (You know we live our pumpkin seeds here in this household). That would make them even better and healthier. You can buy them in bulk in specialty stores or even in your local grocery store.

Give this recipe a try. The chocolate chips temper the sweetness of the marshmallows and make these very delicious.


Happy days.

Rosie


Monday, 13 October 2014

Thanksgiving Dinner

Hi all:

Happy Thanksgiving to everyone. I made a small dinner yesterday, for just the three of us since the rest of the extended family was getting over colds. We didn't want to risk picking up the bug, so we had a small, quiet dinner just for us.

I bought all the fixin's on Saturday and quite frankly, decided to do everything the fastest and simplest way possible. If I am having a bigger crowd (there are usually 9-12 of us) I make everything from scratch, including my own gravy, cranberry sauce, stuffing etc. This year though because there was only three of us, I opted not to go for the standard turkey and all that cooking one entails.  I decided on fast and easy options. Here they are and I have to admit, surprisingly, the meal turned out really good and best of all, there are still leftovers for today. Yeah! I don't have to cook again today.


I bought a frozen Butterball boneless turkey breast. It cooks from frozen at a low temperature (325 degrees) for 4 hours, but mine took about 3 1/2 hours. I added 1/2 a chopped red onion and a little water to the pan as well as chopped garlic to the top of the turkey breast. It smelled great while it cooked and was quite moist when it was carved.
I also bought a package of frozen Butterball dressing. I have never tried this before and was pleasantly surprised. I usually make my own from scratch using day old bread cubes, onion, celery, seasonings etc. but  I let his thaw out a little and then put it into a covered casserole dish to bake. It was quite tasty and didn't need any more seasoning. The potatoes were easy enough. I just bought a bag of Yukon Gold (best potatoes) and peeled, boiled and mashed them with some butter and milk. How hard is it to make mashed potatoes? I also made simple steamed Brussels sprouts. I love them - no one else does but I make them anyways. They are so healthy and the family ate them anyways.  Now the cranberry sauce, I felt a little guilty about. I like to make my own from fresh cranberries with a little orange zest and/or orange juice and usually only buy a can for my sister when her family comes over, but I didn't even feel like making my own, so I opted for canned Ocean Spray instead. No one else eats cranberry sauce in my house, so I opened the can just for me but it goes so fabulously, with a leftover turkey sandwich. Yum.
Finally, I also felt quite guilty about the packaged gravy. I never use packaged gravy mixes; I always make my own with pan drippings but since this type of turkey breast doesn't yield a lot of drippings (that's why I added a bit of water) I added what there was to a package of Knorr turkey gravy and whisked them together. It turned out really good. Usually, I find gravy packages are too salty and don't taste realistic, but this Knorr gravy was very good. I will definitely buy it again to use "in a pinch".
Overall, our dinner turned out really well, considering how little effort it required. I highly recommend these products next time you are pressed for time. And because these dishes were so fast and easy, I think I just might be making turkey dinners more often throughout the year. Sometimes I get quite a craving for turkey dinner and all the fixin's and now I know I can occasionally whip up a dinner without a lot of fuss.


While cooking, I enjoyed a glass of this pink champagne to which I added a splash of St. Germaine liquor. The St. Germaine gives it a sweet, slightly floral flavour and is a very good compliment to the champagne.


Okay, I might have had a little more than a splash and I maybe had 2 glasses of champagne, but really the St. Germaine does add a nice extra layer of flavour.


Even though there were only 3 of us, I insisted on using the old silverware I bought on Ebay. It makes every meal feel special.


This is the tablecloth I used. (No, I don't iron. Who does these days?)  Isn't it pretty? I didn't take a picture of the table all set, but I might recreate it for another post. I used my everyday dishes but they are still quite pretty.


Happy turkey day everyone.

Rosie

Sunday, 28 September 2014

Pretty in Pink

My sister and I went to a really fun evening last weekend. For the ticket price of $20/person, we went for a night out to our local Arts centre for a painting party. It was a wonderful evening!

The gallery room (where there was a showing of oil paintings on the walls) was set up really beautifully with about 17 large artist's easels in the centre and small round tables with linen, crystal and China surrounding the easels. We were welcomed at the door and given our table number and were ushered in to the bar where we could have wine or beer. All of the supplies were provided; canvas, acrylic paints, paint brushes, water buckets and once we had a few sips of our cocktails, we began to paint whatever inspired us.  While we began painting, hostesses served antipasto/charcuterie to our tables that included; Brie, goat and Gouda cheeses, fresh baguettes and crackers, grapes, strawberries, pate, salamis and a beautiful fig sauce.  It was all truly outstanding. We had a lot of fun and vowed to come again with a few of our friends. What a great way to spend a Saturday night.

I had been thinking a lot about ballerinas lately; pointe shoes, tutus and pink ribbon and decided to paint a picture with this theme in mind.

Here is the picture I painted. I started out thinking the colours were too dark when I first applied them to the canvas, but once the paint dried, the colours became a little washed out. Regardless, I hope you like it. The colours are really a very soft pink, but show up more peachy in this light.


A second painting I painted, showing what is really underneath all that crinolin.
( Please do not use these images for your own use without my permission. These are my own original paintings and as such, are copyrighted under my name.)

I hope you like them.

Rosie


Thursday, 18 September 2014

"Hen on Nest"

Hi all:

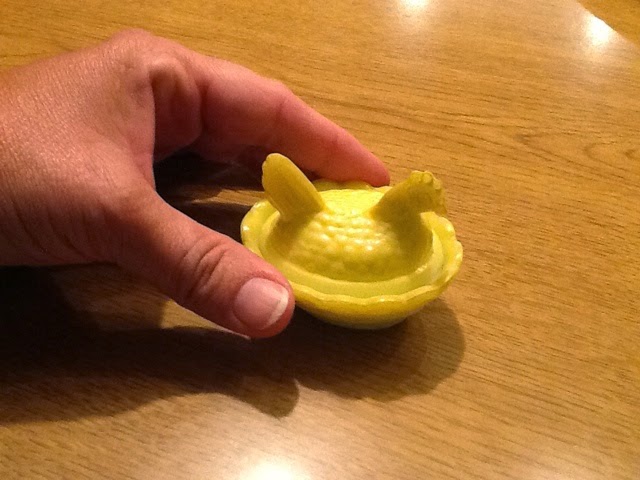
I was out and around today and dropped into a church thrift store and found this adorable little dish for 25 cents, which I thought would look cute on my kitchen windowsill.  I have always loved these vintage chicken dishes and this one is so cute. It is about 2  1/2" long and I believe, is a salt cellar.

Since I have always loved these, I think I might start collecting them. I just have no idea where I will put them!! Space is tight here. I barely have room for my vintage cups and saucers.  (I love anything vintage.)


How cute!!  Let me know if any of you collect things like this. I would love to hear.

Rosie


Wednesday, 17 September 2014

Rosie's Bachelor Baked Salmon

Hi all:

I haven't written a post for a while as I am back at school and it has been really busy again after the long summer holidays.  I am enrolled in Music History and Private Lessons for the trumpet and am also having to practice the piano daily, to bring up my skills to where they once were 3 years ago. I also need to take 3 more semesters of Class Piano and after not playing for three years, I have to relearn all the fingerings for the Major scales as well as the Natural, Harmonic and Melodic minor scales.  Let me say, it is really hard trying to remember all those fingerings, especially when it changes with ascending and descending Melodic minor keys. Yikes!! Who came up with that anyways?

The "Cottage" has been closed up for the summer but hopefully we can make one last trip up there in the Fall. It is so beautiful up there during Wine Festival season. Some many wineries, so little time!!


Having said all of that, I wanted to share my latest recipe with you. I just improvised this tonight and let me say, it was very moist and tasty. Here it is for you to make and enjoy.  I really think I should have my own cooking show. That has been a secret wish of mine, since I was 6 or 7 years old.  I used to watch cooking shows on TV and make my own concoctions in a bowl using my mom's spices and water. I would stir it all up and pretend I was explaining how to do it, to a studio audience.  Move over "Galloping Gourmet"!  Does anyone remember that cooking show? He used to drink wine while he cooked on TV; not a bad idea! I do that myself!  Here is the recipe:

Rosie's Bachelor Baked Salmon
***************************************
(BTW, I call it "Bachelor Baked" since anyone WITHOUT cooking skills, can make this recipe. Sorry to all the bachelors out there!)

1 large salmon fillet (I used wild sockeye)
1/2 lemon
150 gm of cooked shrimp (about 1/2 pound)
Fresh dill weed
3-4 Tablespoons red pepper jelly
Salt and pepper
Olive oil

Spray a large casserole dish with olive oil cooking spray. Rinse and pat dry, the salmon fillet and lay it in the casserole dish.
Sprinkle the salmon with salt and pepper. Sprinkle a few sprigs of dill, ripped up, onto the salmon. Add the cooked shrimp to the top of the salmon. Squeeze lemon juice onto the salmon and also add 3-4 Tablespoons of red pepper jelly. I used  Palmalito brand Jalapeño Pepper Jelly. Simply spoon out the pepper jelly and spread it over the salmon and shrimp. Drizzle the entire salmon with olive oil, cover with aluminum foil and bake at 325 * (degrees) for about 30-40 minutes, until cooked all the way through. The salmon will be very moist and flavourful as it actually poaches in its own juices. 

Add some boiled new potatoes and some baby carrots and you have a great meal. (And the sauce works well on top of the potatoes too)  No fuss, no muss, and so simple, ANYONE can do it. If you want to impress your significant other with your culinary skills, this is the recipe for you!!

Enjoy!


Did you notice the dings in the jar lid? I had to really whack it, to open it.

Bon apetit! (I just said this in my head, like Julia Child)

Rosie