Saturday, 2 November 2013

Hallowe'en Pumpkins

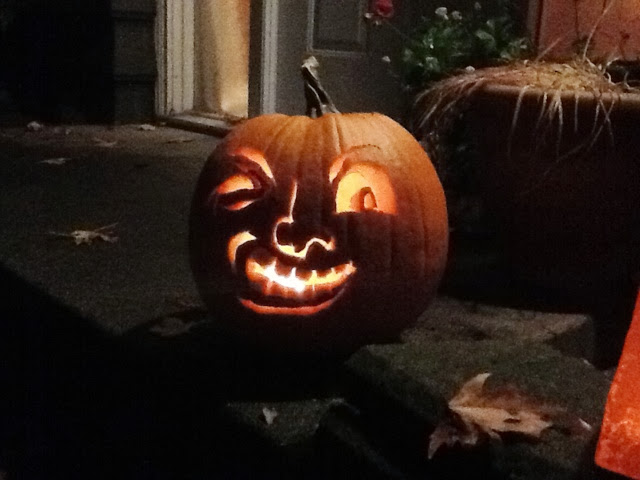
I just thought I would post pictures of the lighted pumpkins I carved.  They turned out pretty well and look much better in the dark. Kind of like me!!


This was the first year we ran out of full-size chocolate bars and my husband had to frantically run to the store to buy more. (The lucky trick-or-treater to get the last 12" Br. Big bar, was a very small 3 year old.  There was much joy expressed by the parents of that said child). We had a record number of trick-or-treaters this year; perhaps because the word got out that our house gives out full size chocolate bars.  It seems we now have a reputation to uphold!!!

Have a wonderful November.

Rosie

Thursday, 31 October 2013

Pumpkin seed update

Well, the pumpkin seeds turned out excellent!!! Nice and crunchy and bursting with flavour.  You simply must try making them!! (Oh and don't roast them for a hour; maybe 30-45 minutes.)
As well, I worked up quite an appetite cleaning out those pumpkins and slaving over the stove! I was very hungry today and wanted to make a quick, easy lunch.  It is a twist on my old favourite, the Blackened Fish salad.  I actually made the Blackened Fish salad for dinner 2 nights ago (and yes my 19 year old son really liked it and ate it) and I had some leftover quinoa from that.

For this salad I used cold leftover quinoa, cut up cucumber, feta cheese, raw pumpkin seeds, raw sunflower seeds, dried cranberries and a healthy dollop of tzatziki as a dressing.  It was fabulous, I must say.  I think I could easily be a vegetarian, as long as I had feta cheese! (Of course they were out of boxes of quinoa at the store the other day, so I ended buying a box of a blend of quinoa, couscous and something else, which escapes me right now.  It was really good and I may switch to that from now on).
Doesn't this look fabulous!!??  It was!!    And so simple, healthy and quick!!!  Try it and let me know how you liked it.

Rosie

Happy Hallowe'en!!!


Happy Hallowe'en everyone!  Here are 2 pumpkins I carved this year for the kidlets to enjoy.  The one on the right is called "Jack the Winker" and I found his face/template on marthastewart.com.  I did my best to replicate it but he is a little rough.  The one on the left had a huge misshapen "wart" on the back so I decided to cut that out in a wedge shape to make a witch's nose.  I will have to try to find a hat for her/him. I  bought three pumpkins this year but alas, the last one which was the plumpest, is rotten and moldy already so I may just put it out after 10:00 for the hooligans and ne'er-do-wells to do with as they please.  I just hope it doesn't end up smashed up on my neighbour's front lawn!

As I write this, the aroma of roasting pumpkin seeds is filling the kitchen.  Every year, we look forward to carving the pumpkins because that means having delicious pumpkin seeds to eat. We love them!!

To make them, all you need is 3 ingredients; fresh pumpkin seeds, olive oil, seasoning salt.

Rinse all of the pumpkin seeds under cool water to remove the pumpkin pulp.
Then, spread them on a cookie sheet and sprinkle with a good quality olive oil and seasoning salt.  I used Hy's seasoning salt this year, but in the past have also used Johnny's seasoning salt.  Really, any kind will do.  Then just toss them with your hands and roast in a 350 degree oven for about an hour or so.  I never really remember how long to roast them; just occasionally test one for crispness.
Occasionally toss them while roasting to toast both sides. ( NOT WITH YOUR HANDS THOUGH. Use a spatula!)  Voila!  An excellent snack!

Happy tricks and treats!!

Rosie

Monday, 28 October 2013

Almost finished my quilt, hurray!!

I have finally had lots of time to spend sewing and finishing the next quilt that I am making.  In a previous post I mentioned that last summer,  I had cut out all of the pieces for the "Sketches of Spring" quilt that I was making.  That really saved me a lot of time this time around as I just started sewing and it came together really quickly within the last 1 1/2 weeks. I even made use of the "chain piecing" concept and boy, whoever came up with that, WHAT A GENIUS!  In the past, I was always piecing my squares individually and was diligent about back stitching both the beginnings and endings of all rows.  Well, that flew out the window and I couldn't be happier about it.  No more backstitching rows for me!   (N.B.  this quilt called "Sketches of Spring", uses the Illuminating Spring fabric collection by Stephanie Marrott for Wilmington Prints.  I think the fabric is out of production now as I had a hard time finding this quilt kit.). 
Here are some pictures of my progress and the (almost) finished quilt.

Here is my beautiful Kenmore sewing machine that I have had for about 12 years.  I love it and it never gives me any trouble.  It is a 20 stitch machine and that is all the stitch styles that I could ever need.  Did you notice my thread colour for this quilt?  It is a medium grey and is Mettler number 624. I was told by a quilting instructor that you can never go wrong with grey thread for your work. You can always find a shade that will blend very easily, especially with multiple colours of fabric and I have adopted that practice. It makes it really easy to pick out thread for your work.
Here, I am starting to sew the squares together.
I think this is called "Courthouse steps"?  I am not really sure and I could've just made that up!  Let me know.
Here is a picture of my cute sewing basket that my husband gave to me last year for my birthday.  Previously, I had been using a small pink Clinique box that I got with a promotion for skincare. This is far better, but I must say, it was really hard finding nice sewing baskets so that I could direct my husband to the correct store.  They are very expensive( for what they are!) and very hard to find.  Surely I couldn't be the only person using these?  What are we supposed to use, Rubbermaid containers? They might work fine, but you sure don't look as cute carrying them from room to room!

Here I am, sewing with my newfound technique of chain piecing. What a time saver!
This is the wrong side of the square. I was pretty diligent about ironing each seam as I went along. I think it helped make the seams look crisper.
Here, I have tagged the beginning square of each row, so that I don't get them mixed up. (I know this is possible, from past experience!!)
Do you remember in a previous post, that I was told that every quilt should have a mistake in it and that it was never an issue for me, as I usually screw something up along the way?  Well, have a close look here. I managed to sew an entire row upside down to the previous row.  And that was AFTER I CHECKED to make sure I was sewing it on correctly!!!! Oy veh!!!!! Needless to say, I was not happy about having to unpick that whole row, especially as I still backstitch on the beginnings and endings of those rows.
It is coming along very nicely here.  And below, is my ever-present Project Manager Kirby, who is inspecting the progress.
Kirby, looking very closely at my stitching and also looking very scruffy as he is in the middle of shedding; that said "shedding" really should be called "non-stop vacuum clogging" as one shedding season melts into another and we never really get a break!
But, he is cute!  Thanks, Kirby.
More pictures to follow in another post.  I have posted too many already!!  Happy sewing.

Rosie


Wednesday, 18 September 2013

Goodbye to "The Cottage"

I know it has been a long time since my last post, but I wanted to post a picture of one of the final days up at "the cottage" this year.  

As the Fall semester is back in full swing, I have a little less time to add new posts, but I will try to keep up to date.  Although I am only taking 1 class this semester, it seems playing catch-up around the house, is taking a lot more time than I thought.

I am now in 2 bands including my favourite, a big band, and will be busy practicing the charts/pieces for those.  Some of the pieces currently in my folders include:

Concert Band: 
"The Fairest of the Fair" - John Philip Sousa
"Allerseelen" - Richard Strauss
"Carmen Fantasy" - Georges Bizet - arr. by Eiji Suzuki
"Paris Sketches" - Martin Ellerby
"October" - Eric Whitacre
Etc.....

Jazz Band:
"Such Sweet Thunder" - Ellington/Strayhorn
"Out of Nowhere" - arr. Jim Martin
"Speak, O Drum God!" - Harry Stone
"Opals" - Frank Strazzeri arr. Rob Pronk
"Jersey Bounce" - Platter/Bradshaw/Johnson/Wright. Arr. Nestico (I will play the solo I wrote for this one)
  Etc...... 

It is shaping up to be a great year, especially in jazz band so I am looking forward to it.  I wish there was some way to post audio on my blog.(If so, I could post concert performances and also a performance of my original composition, performed in April this year.)  Maybe there is, but I am not savvy enough to know how to do it. Oh well......

Rosie
Monday, 19 August 2013

Pin Cushions...addendum

Yes, it seems I am crazy for pincushions.  Since hypothesizing about collecting them yesterday, I ran out to a local fabric store here today and found another one similar to the pink slipper one I showed in yesterday's post.  It is very cute as well and best of all, it was in the 50% off bin, so cost very little.  Both of those are made by Dritz and you can check out their website at:  www.dritz.com.

Enjoy!

Rosie.

**N.B.  I should have checked the Dritz website first.  I could not find these particular pin cushions on their website.  Further searching led me to www.njeffersonltd.com, a website for sewing notions et al.  Search for the "So Girly" line.  My apologies.

Sunday, 18 August 2013

Pin Cushions

Hi all:

It has been far too long since my last post!  I can't believe how fast the summer is flying by.  I have had a lot of company up here at the cottage, so needless to say, I have been very busy cooking, enjoying, living!!

I thought I would post a quick post about pin cushions.  Who doesn't love pincushions?  I know I do!!!!

My first introduction to pincushions was in my Mom's sewing box.  She was, and still is, an excellent sewer and sewed many a doll dress/barbie outfit for my 2 sisters and me. You know the kind of vintage wooden sewing box that  folds out, accordion-like, to a V shape? Well, in that box of tricks, was a silk pincushion that I am sure, many of you have seen.  It was circular, with stitched off silk segments in various colours, and on the outside of each segment, was a small Chinese man, holding open his arms and encircling the segment.  Does that sound familiar to anyone?  It should, as I think that was very common-place in sewing kits, way back when....  My mom probably still has that pincushion; I haven't asked, but I always thought it seemed so exotic and decadent.

Well, I don't have one of those pincushions, but I do have an index-finger pincushion that I use every time I sew.  I bought it at a quilt show a few years ago and I love it.  It is small, compact and very handy.  I think I paid $2.00 for it.  It is made out of a plastic bottle cap, stuffed with stuffing and then topped with fabric and trim. It then has elastic added to hold it to your finger. It is so cute that I made a few and gave them away as small gifts. You could have a lot of fun making these.  I made one to look like a crown and glued on pearls and jewels.  The ideas are endless.

Here is my finger pincushion and another one I just couldn't refuse when I saw it.  Perhaps I will start collecting them??


This next one is too cute for words.  Isn't it the cutest you have ever seen?  I would love to see some of your pin cushions.  Send me pictures and I will post them.

Rosie