Wednesday 25 November 2015

My life in a nutshell!!

Hi all:


This is my life in a nutshell!!  This really happened today:

I had a fortune cookie left over from Chinese take out, sitting on my counter.  I was about to throw it out but decided to open it to read the wise fortune that I was convinced, was coming my way.
I had to laugh.  This basically sums up my life.  I wonder who was asleep on his shift at the fortune cookie factory, because my cookie HAS NO FORTUNE IN IT!!!
That pretty much says it all!

Does anyone have a wise fortune saying, they can share with me?😉

Rosie


Sunday 4 October 2015

One Pan Breakfast Brunch


Hi all:

It is Sunday today and I was craving an egg and toast breakfast but wanted something fast and easy that had extra flavour. Enter this recipe I made up on the fly this morning.  It has crispy toast, eggs and sautéed vegetable goodness and is very tasty.  It uses up any leftovers you have and best of all, once in the oven, you don't have to fuss and time the finished eggs with the toast etc.  Here it is:

One Pan Breakfast Brunch
**********************************
6-7 pieces of bread ( I used 3 slices of thick Texas toast and 4-5 slices of French bread)
1/2 red onion - diced
1 red pepper - diced
Mushrooms - diced (about 1cup)
9 eggs
3 handfuls of  organic mixed greens for salad ( I used mixed baby kale, baby spinach and red and green Swiss chard)
Approx. 2 cups of frozen hashbrowns
Salt and pepper
Olive oil

Preheat oven to 350 degrees. Spray a rectangular casserole dish (9x13) with olive oil. In a cast iron skillet, add some olive oil and sauté the red onions until brown.


Meanwhile, dice the bread into bite size cubes. Larger cubes will stay crispy in the oven.


Add the diced red pepper to the onions and brown.  Next, add the diced mushrooms.


Next, add about 3 handfuls of the organic salad greens. They will wilt down quite a bit but provide a lot of vitamins and nutrients.


Add the salt and pepper at this point.

In the casserole dish, layer the Frozen hashbrowns, the vegetable mixture and the cubed bread on top. ( I put the bread cubes on the bottom, but I think they would be better and crispier on the top).


Beat the eggs really well and pour them over the entire mixture of bread and vegetables.  It is Ok to leave some bread cubes exposed and not coated as they will get crispy like toast, in the oven.


Bake in the oven for about 25-30 minutes, or until eggs are cooked through.


I hope you enjoy this Sunday Brunch.


Yum!

Rosie


Friday 18 September 2015

Egg-less Chocolate Zucchini Cake


Hi all:  I needed to use up the huge zucchini I grew this year in my garden and what better way than to make chocolate zucchini cake.  I got this recipe from my good friend Andrea, who is a dietitian, so I know this is the healthiest version you can find.  Her recipe originally called for 2 eggs, but I didn't have any, so I had to improvise.  I opened up my fridge and saw yogourt, so I decided to try it.  Well, let me say, the cake turned out really good and the texture was very light and moist.  I think I may use yogourt from now on.

Here is Andrea's original recipe, to which I have made some alterations.

Chocolate Zucchini Cake
:::::::::::::::::::::::::::::::::::::::
1/4 c. Butter (I used Vegan Becel margarine - we have to avoid lactose in this house; check your labels.... You will be surprised to find lactose/whey in your regular margarines)
1 + 3/4 c. Sugar
2 eggs (I used about 1/2 c.  Liberte  vanilla Greek yogourt instead. I think the high protein content in Greek yogourt makes this work.)
2  + 1/2 c. Flour
1 tsp. baking powder
1 tsp. baking soda
1 tsp. salt
1 tsp. vanilla extract
4 Tablespoons cocoa powder
1/2 c. Oil (I used canola oil)
1/2 c. Sour milk (use regular milk and add approx. 1 Tablespoon vinegar)
2 c. Shredded zucchini (washed; leave peel on)
1/2 c. Chocolate chips
1/2 c. Nuts (I did not use nuts)

Preheat oven to 350 degrees. Grease and flour, 2 small loaf pans. Beat together the butter (margarine), sugar and eggs(yogourt).  Add cocoa, oil, sour milk and vanilla and beat until mixed.  Measure dry ingredients in a separate bowl, mix together and then beat into wet ingredients slowly.(I usually add dry ingredients in 3 batches).  Add zucchini and chocolate chips (and nuts, if using).  Fold these into the batter.  Bake for approx. 50-60 minutes or until cake testrer (bamboo skewer) comes out clean.  My oven actually only took about 47-48 minutes to bake, so watch your loaves carefully.
Enjoy with a cup of coffee; decadent indulgence!  Did I mention this is healthy for you? I am sure it counts for daily servings of vegetables.


Enjoy!

Rosie

Saturday 15 August 2015

Carrot Soup

Hi all:  here is another winner from my cookbook "Crap, What am I Going to Make for Dinner?"

,,

I tried to do a fancy design with cream here, but clearly I am NOT a talented barista. Don't laugh!!!(You know those pretty designs they add to the foam on lattes).  I should practice this technique more!!  This may not be pretty, but the taste is very "Michelin star" worthy!!

Anyhow, here is the recipe I developed many years ago but this time I made it super easy.  I wanted to get rid of all the old carrots in my fridge and hate wasting them, so I thought I might make a pot of carrot soup.  Trust me, this is a winner!!


Don't throw away those old, dry baby carrots.  Simply rinse them and put them in a soup.  It is delicious and healthy.

Carrot Soup
###########

Approx. 4 cups baby carrots (they are already peeled and I didn't even dice them. Use them whole)
1 small red onion - diced
4-5 sachets of OXO chicken bouillon 
2 Bay leaves
Olive oil - 1-2 Tablespoon
Basil - 2-3 Teaspoons (this is the key flavour)
Onion powder - 3-4 pinches
Garlic powder - 3-4 pinches
Salt and Pepper
Cream or milk (optional)

In a large Dutch oven, add some olive oil (approx.1-2 Tablespoons) and brown the onions until golden.


I

Add the bagged baby carrots (rinsed and whole) to the onions. If using large whole carrots, peel and chop them to bite size pieces.


Add 4-5 sachets of chicken bouillon to 4-5 cups of hot water and dissolve. Add the broth to the onions and carrots. Add the basil, bay leaves, salt and pepper, a few pinches of onion and garlic powder to the broth.  Cover and let the broth come to a boil, then reduce to simmer and let the carrots cook until very soft (about 35-50 minutes).  Once the carrots are very soft, remove from heat.


Remove the Bay leaves and blend the broth and carrots with an immersion blender. I placed the Dutch oven in my sink, to avoid splashing all over the entire kitchen.


At this point, you can add a few splashes of milk or cream to make the soup creamier, but you can see that this is really very thick already.  Add some more salt to taste, as I find that this soup does need salt.

As a final garnish, add a splash of milk or cream to the top of the soup bowl before serving, to add a decorative and creamy taste.  As I said, I need to practice this.


Homemade soups are a staple in my house, all year long. I don't get this "new" fad that is showing up in the media, about being green and using up leftovers for meals.  I have been doing that for decades now.  It's called "cooking"!!!  Any fine cook worth their salt, uses up what is leftover from previous meals.  It ain't rocket science.

You will love this soup.  It is indeed a winner.

Enjoy.

Rosie


Thursday 13 August 2015

Beef Pot Pie


Hi all:

This is another recipe from my best-selling cookbook, "Crap, What Am I Going to Make For Dinner?"


Let me clarify "best-selling"; by best-selling I mean, it has been the best selling cookbook "I" have ever written. Yes, I have only written this one cookbook, but I have sold a whopping 4 or 5 copies, so it really is the best-selling book "I" have ever written. (My novel, on the other hand, is still in the editing stage, so I can't really say it is a best-seller yet.)

I had a real craving for pot pie yesterday and bought enough ingredients to make 3 of them. I gave two away to my sister, who is in need of some support on the Homefront right now, and kept the other for dinner.  Boy, am I glad I did!  I forgot just how good these are. I developed this recipe many years ago and have made it with both beef and chicken.  Both are equally good.  I urge you to try one.


Doesn't it look delish?

Here is the recipe, right out of the pages of my best-selling cookbook.


I did also use 2 other ingredients which were somehow left out of this recipe; garlic powder and onion powder, my two pantry staples.  You can't cook without them, as far as I am concerned. I also omitted the milk this time and it turned out fine.

This will make 1 very large pot pie or 2 smaller ones. I used frozen pie shells as I don't like fussing with making pastry dough.  They are usually very good and I just used the No-Name brand.


Here are also some extra tips and techniques I used for this recipe.

Brown the ground beef (or cubed chicken breast) in olive oil. Add salt, pepper, basil and the onion and garlic powders. Stir together and when browned, drain the fat and set the meat aside.

In a large Dutch oven, brown the red onions in olive oil. Once browned, add the diced carrots, celery, mushrooms, 2 Bay leaves and the beef (or chicken bullion). I used Oxo beef bouillon sachets. They give a nice, concentrated flavour to the broth.  I have tried the broth in cartons for this recipe, but these sachets really give a lot more flavour.  I simply dissolve each sachet in about 1 cup of hot water and then add the buillion to the vegetables. Let the vegetables simmer and soften for about 10-15 minutes, then strain the vegetables from the broth, using a mesh strainer over a large bowl.  Keep them separate until later.


This has 25% less sodium and still tasted fine.


Now to make the roux.  In the same Dutch oven, which is now empty of vegetables and broth, add about 3-4 Tablespoons of olive oil (or butter) and add in an equal amount of flour. Slowly incorporate the flour into the olive oil until a thick paste is formed. Cook over lower heat until the flour taste has been cooked off (3 -4 minutes or so). Once done, add the broth back into the flour roux very slowly, using a whisk to avoid lumps.  Keep whisking and slowly incorporate all the broth. Next, add the vegetables back into the broth.  Simmer for a few minutes, to thicken the broth.  I did add a little Veloutine to help thicken the broth.  Sometimes, it can be runny.


Now, just add the beef (or chicken) back in with the broth and vegetables, stir and fill your bottom pie shell with this mixture. I usually use a fork to pierce the bottom pie shell first, before I fill it. Next, remove the other pie shell from its foil pan (I usually remove it when it is slightly defrosted. If you wait until it is completely defrosted, the pastry will stick to the foil pie pan and will tear). Put the top pastry shell onto the pie base and pinch the edges to seal. Use a fork or knife to make small slits in the top pastry, to allow steam to escape. I also used strips of foil to cover the pie edges once pinched, so that they don't burn while baking. Place the pie on a foil lined baking sheet and bake for about 35 minutes or until golden.


That's it!! Trust me, you will love it.

Side note:   Did you notice that fancy bright orange bowl I was using? It is from a set of 4 "ZAK! Designs" bowls that I found here at Winners a few months ago. I know you can find them on Amazon, but I was lucky to find them elsewhere. They are melamine, are very versatile and come in festive confetti colours. I love them.  Here is 3 of them.  The other is AWOL.( somewhere buried in my fridge).


Enjoy the Pot Pie.

Rosie


Thursday 6 August 2015

When life hands you lemons, make.........


Devilled Eggs!!


Some people may assume the answer to that old adage is "lemonade" but I am here to prove those people wrong. The answer to life's trials, is devilled eggs.

Up until a few years ago, I wouldn't have been caught dead eating a devilled egg, let alone eating it anywhere outside my own home. ( I had a phobia against eating those or egg salad sandwiches or drinking milk outside the confines of my own home.  It was all about the dairy products picking up weird tastes from someone else's fridge. Can anyone else relate?)

Fast forward to about 5 years ago, when I was in charge of organizing the food for the 75th anniversary celebration of the community band I play with. (New Westminster and District Concert Band). I ordered platters of all the standard fare you would find at such an event from Thrifty Foods and had to feed about 175 people. (I can't remember the exact number of people, but it was a lot!!) I had to provide sandwiches and side dishes for everyone and Thrifty's suggested their devilled eggs as an accompaniment to the sandwiches, vegetable and fruit platters, pickles and olives. I winced at the thought; after all, I wouldn't have to eat them, but they assured me that their devilled eggs were very popular, everyone loved them and they always disappeared quickly.  I gave in, ordered the devilled eggs along with the other food and never gave them another thought until the day of the event.

Well, suffice to say, those devilled eggs disappeared like hotcakes!!! Before the last one "met its maker", I managed to try one for myself.  I was converted!!! It was cold and creamy and tasty and I vowed then and there, that I would never be afraid to try boiled eggs or egg salad again.  Since then, I have bought those Thrifty's devilled eggs myself and have even ordered egg salad sandwiches for lunch.  I have come a long way.

Today, I made up my own recipe for devilled eggs. They are great on a nice piece of artisan bread for a light summer dinner,  so I decided to make some tonight.  Add a pickle and some fresh vegetables on the side and your dinner is served.

Here is the quick recipe:

Devilled Eggs
*****************

6  - Eggs  - hard boiled ( I used Born3- omega 3 eggs. They taste the best and have a beautiful orange yolk)
Salt
2 Tablespoons mayonnaise
Paprika - a few pinches
Crispy fried onions (I found a container of these at IKEA, of all places, but French's fried onions are the same)

Cook the eggs in boiling water for about 20 minutes and then immerse in cold ice water until the eggs have cooled completely.
Peel the hard boiled eggs and cut them in half  lengthwise, with a sharp knife. Make sure you clean the knife after every cut, or the next egg will not cut cleanly.  Scoop out the cooked yolk into a small bowl. I used a small teaspoon.  Add the paprika, mayonnaise and salt to taste.  Mix with the teaspoon until all combined and then drop teaspoonfuls of the yolk mixture back into the egg white "boats". Usually a better chef than I, would take the time and pipe in a fancy design with the yolk mixture, but as I am not Anthony Bourdain, I just added a dollop from the teaspoon. Add the crispy fried onions to the top and there you have it.  Yum!


Don't be afraid to try these. They are a good way to use up eggs that are expiring soon. I used to think these were so time consuming and fancy.  Let everyone THINK they are.


Enjoy,

Rosie


Tuesday 28 July 2015

Chicken Ratatouille


Hi all:


If it is just me up here at the cottage, I like to prepare healthy, easy dishes that I know no one else in my family will even touch. These dishes are usually vegetable based, as I love vegetables. Sadly, the rest of my family doesn't share my passion for vegetables, therefore they never get to try these concoctions I like to call, Cottage Fare. (ie. Healthy vegetable-based dishes.)

I grew up at a dinner table where it was expected that we eat and finish everything on our plates, including vegetables. When I balked at this "grave injustice" my Dad would always say, "Think of the good things you are feeding your body. Your body will thank you." That resonated with me then and has influenced me ever since.  Thanks Dad; you were always ahead of your time. I now love my vegetables and always think of you when I eat them. (Except for creamed spinach; there is no way I will EVER eat that again!)

Tonight I made a vegetable based meal inspired by a fantastic lunch I had at White Spot the other day (a restaurant chain here in BC). It was a wild grilled salmon fillet on top of a warm smashed potato salad with grilled tomatoes and zucchini and topped with a caper sauce and julienned beets.  It was absolutely fabulous!!!! What is not to love about that dish; salmon, vegetables, pickled beets?? It was heavenly. So, I set about trying to duplicate that divine dish. I am not sure I accomplished it, but my attempt was very good. I may have to go back and order it again at White Spot, purely for research purposes, that is!

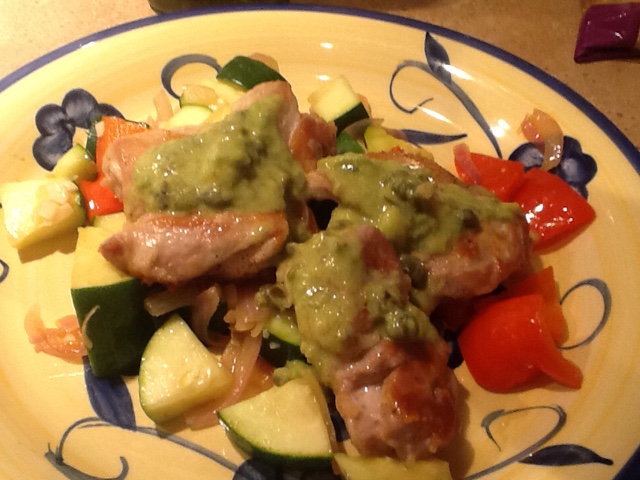
Here is the dish I came up with.  I call it "Chicken Ratatouille".  Typically, ratatouille I am told, has tomatoes, eggplant and zucchini in it.  I did not use tomatoes or eggplant, but my version is close to that and I simply added grilled chicken thighs to it, and my own improvised caper sauce.

Chicken Ratatouille
************************
6 boneless, skinless chicken thighs
1 red pepper - chopped large
1 zucchini - chopped large
1/2 lime 
1/2 red onion - chopped
1 garlic clove - minced (I would omit this next time. There are enough flavours competing already)
1/2 avocado
5-6 pickled beets - julienned into strips
3 tsp. capers and brine
3-4 Tablespoons of milk
Salt and pepper
Olive oil

In a large skillet, add some olive oil and heat on medium high. Salt and pepper both sides of the chicken thighs and brown them in the skillet with the olive oil. Brown them on both sides. When done, remove from pan.


To the same skillet, add the diced onions and brown slightly. Next add the red pepper, zucchini and garlic and brown until slightly softened. Add more salt and pepper to these vegetables. They will need it. Also add a little more olive oil so the vegetables do not stick.


I kept the size a fairly large chop, so the vegetables stay crisp and do not wilt when browned.


Once the vegetables are browned, remove to a plate and set aside.


In the same skillet, add about 3 tsp. of capers and the caper brine. Mash the capers slightly to release the flavour.


Next, add in the 1/2 avocado and mix with the capers. Squeeze in the juice from 1/2 lime and stir into the capers.  


Next add 3-4 splashes of milk and stir until a creamy sauce forms. Add as much milk as you like. I used about 3-4 Tablespons. (Or thereabouts.)


You won't have a lot of sauce; just enough to flavour the chicken.  Next, assemble the plate.
First add the vegetables to the plate, then add the chicken. Top the chicken with a couple of spoons of the sauce and add some julienned pickled beets. ( I used beets right out of the jar and sliced them on a separate plate, to avoid staining any of my cutting boards.)


Et Voila! C'est magnifique, non? (It really was very good. Nice to have something different.  My poor, poor family will never get a chance to taste this! Oh well.)

I hope you enjoy this dish as much as I did.

Rosie

P.S. I had to share which wine I was drinking, while I cooked. It was a sparkling organic fruit rose from Harkers Rustic Roots in Cawston, BC.  What a great flavour and beautiful peachy colour.