Monday, 4 November 2013

Finishing touches on latest quilt

I find myself adding more and more border fabric to my most recent quilt. Luckily I remembered that having it machine quilted will cause it to lose a few inches so I have been adding more to it to keep it close to a queen size quilt. (I have used double thickness of batting for my last two quilts and plan to do the same again with this one. I find one layer of batting is not warm and cozy enough.)

At first, I thought 1 row of border fabric would suffice but I quickly realized that I needed a second and that I had a lot of left over fabric which I could use up.  I like making borders of long strips of the fabric I use in my quilts.  It makes the quilt seem more "patchwork" and in fact, I purposely cut the 5" wide strips to different lengths to achieve that look.  I have always been a fan of the more "patchwork" type quilts that aren't perfect; ones that don't seem like they have been meticulously plotted and planned. (Although this particular quilt was very time consuming and required a lot of cutting, I couldn't resist the colour combination of pinks and greens, my favourite ever since I was a little girl). 

You will also notice that I did not mitre the corners, as the pattern suggested.  I simply sewed on lengths to the sides first and then to the tops (or the other way!)

I now find myself wanting to add a third border row.  Below are pictures of the quilt so far and close-ups of the last border row fabric and also the backing flannel I bought for the quilt.  I usually like to buy fabric from the clearance section of the fabric store.  Paying full price for fabric is very expensive so I love the challenge of finding just the right fabric for a quilt, in the clearance section.  (This quilt I am making now, is a real novelty for me.  I have never bought a kit before to make a specific quilt.)

Here is the quilt so far:
The fabric with the music and roses was not part of the kit but I found it during the summer and couldn't resist it as it has my name printed within it and the colours matched the quilt colours perfectly.
Here is my name in the fabric.(above)
Here is the pink fabric I will use for the last (I think) border row.  It is from a different fabric line than the quilt. (It is Imaginarium from Camelot Fabrics).
I like the vines and polka dots.  I think it will work well.
Here is the flannel for the backing.  I wanted something light pink to go with the mostly green fabrics on the front of the quilt.  It was $4.98/metre in the clearance section.  I really like the daisies even though the green centres do not exactly match the greens of the front fabrics.
There is a little bit of white texture to the petals of the daisies.

Sorry this picture is blurry.  I will post the quilt top once it is finished.

Happy sewing.
Rosie


Saturday, 2 November 2013

Finger Pin Cushion Tutorial


As I have stated in the past, I love pincushions and since it is so wet and miserable out today, I thought I would post a tutorial on how to make a pincushion like the one I am wearing on my index finger, in a previous post.

Here is a picture of the finished one I just made, with step-by-step instructions on how to make your own.  Let your creative side shine!


I like how this looks just like a crown; I guess this is about as close to royalty as I will ever get!!

Here's how to make it:

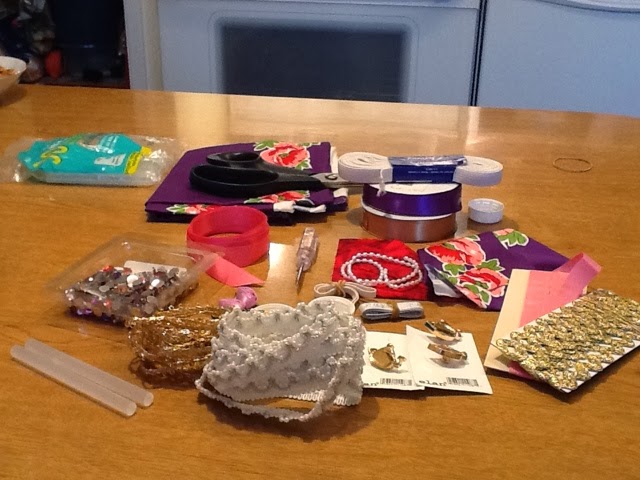
Supplies you will need:
****************************

1 bottle cap from a 2 litre (bullet) bottle of pop
Glue gun with 2-3 glue sticks
Approx. 5" piece of  1/4" elastic
Needle and thread
Hole punch or awl
Small amount of leftover fibrefill or batting
Approx. 5" square piece of remnant fabric
Various bits of trims, rickrack, buttons, ribbons
An elastic band


Let's get started.

1). Punch 2 holes into the top of the bottlecap and enlarge slightly enough for the elastic to thread through.

2). Using the hole punch or awl, poke the elastic through one hole, to the underside of the bottle cap.  Tie a double knot into the elastic in the underside and add a generous amount of hot glue to glue the knot in place.

3). Next, position the bottle cap on your finger and determine how much elastic you will need to wrap around your finger through the other hole in the bottle cap.  Make the elastic fit slightly snug, as over time it will slightly stretch, but not too tight to be uncomfortable or cut off circulation.

4). Next, take a small amount of batting or fibrefill and form into a ball or wad shape.  Form it rather tightly, so that it will hold pins well when the pincushion is done. Next,  tightly wrap the piece of fabric around the ball of batting and secure it very tightly with an elastic band. 

5). Using the needle and thread, tack stitches around the base of the batting, going through the fabric.  This is just extra security so that the fabric doesn't unravel over time once glued into the bottle cap. Trim off the excess fabric/batting so that a small stub remains.  Glue this into the bottle cap.
Hold in place for a few minutes, to ensure glue dries and cools.  CAUTION: be very careful when using a hot glue gun as the glue can (and DID!!!) burn your skin.  I found out the hard way that it is best to use the hole punch/awl as a tool to help when gluing pieces into place instead of using my bare fingers.  Youch!!!!

6). Now comes the fun part of using your own scraps to come up with a design.  Here are some samples of mine.

7). Glue on your trims and scraps with the glue gun, being careful of your fingers! (I now have a blister where I burned mine).
Done!!! ( Is it just me or does my hand look like a gorilla's?!! There go my dreams of ever being a hand model!)
Finally, I glued on a jewel to make it that much more convincing.


I hope these directions were clear and straight forward.  Please email me pictures of ones you make.  I would love to see them.

Rosie